

How to Install WordPress Locally without XAMP! Install Bitnami WordPress. In this article, we discuss how to install WordPress locally. Now we discuss installing WordPress without XAMP. You can also get the procedure to install Bitnami WordPress.
If you want to build a WordPress site you need to buy a domain and hosting. And then launch a live website. But if you don’t want to launch a website. Just try and test WordPress you can do this by reading this article. So read this article carefully and install WordPress locally. If you want to install WordPress locally then all your website files will be stored on your PC. This means only you can access the website. This is a great way to learn about making a website. And this is free of cost. Because you don’t need to buy a domain and hosting to make a website. Also, you can move this local website into a live website. Now follow the procedure to install WordPress.
How to Install WordPress Locally without XAMP
For this, firstly download software. This software name is Bitnami WordPress. This is software that allows us to run WordPress on our computer. To download this software go to your browser. Then open the www.bitnami.com website. Then go to the Application option. Now scroll down and Download the WordPress package by Bitnami.

Click the ‘Download for Windows 64-bit’. The download will start after the click. It should take several minutes.
Install Bitnami WordPress
Now we discuss the installation procedure. After finishing the download open the Bitnami WordPress. Then select the language and press OK. After pressing open the welcome screen. Click Next to proceed with the installation.

Then open the ‘Select Components’ page. Press Next. An installation folder window will appear. Then select a folder in which the software is installed. After choosing the folder press Next. Then open the ‘Create Admin Account’ window.
In this window enter your name, Email address, login name, and password. You can enter the password for confirmation also. A username and password will be needed to log into the administration panel. So note the username and password carefully. Because without these you can’t log in the WordPress. Then click Next to proceed. Enter the blog name for WordPress. Then click the Next button to proceed. Configure SMTP setting window will appear after pressing Next. Then click the Next button. After pressing the Ready to Install window will appear. Press the Next button.
Finish the Installation and Launch Bitnami WordPress
The application will now begin installing to the specified directory. This process usually takes a few minutes. When the installation process is complete then will see the success message. After completing the installation press the Finish button.
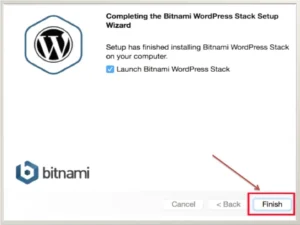
After pressing the Finish button a new browser window with a welcome screen will appear. Also, you can access this welcome screen by launching your Web browser. And then enter the URL http://localhost into the browser address bar.
Finally, click the “Access WordPress” link. Then you see the front page of your blog with a sample post. Now we discuss logging in to WordPress locally.
To log in to the WordPress dashboard open your browser. Then type the http://localhost/wordpress/wp-admin and press Enter. The widow will appear which is given below.
Enter your User name and password into the text field. Then press the Log In button. Now WordPress dashboard will appear. In this dashboard, you can manage posts, pages, and comments. You can also customize your blog with various themes and plugins. Now start blogging using WordPress.
We think you can install easily Bitnami WordPress after reading this article. If you have any questions, comment to us. We try to solve your problem. And visit our website www.btebgovbd.com for updated technology news. Thank you for watching our website.